Nelson Service & Support

Nelson 700 Series (All Models 700 & 760) Horse & Livestock Waterers

Replacing Heater & Thermostat
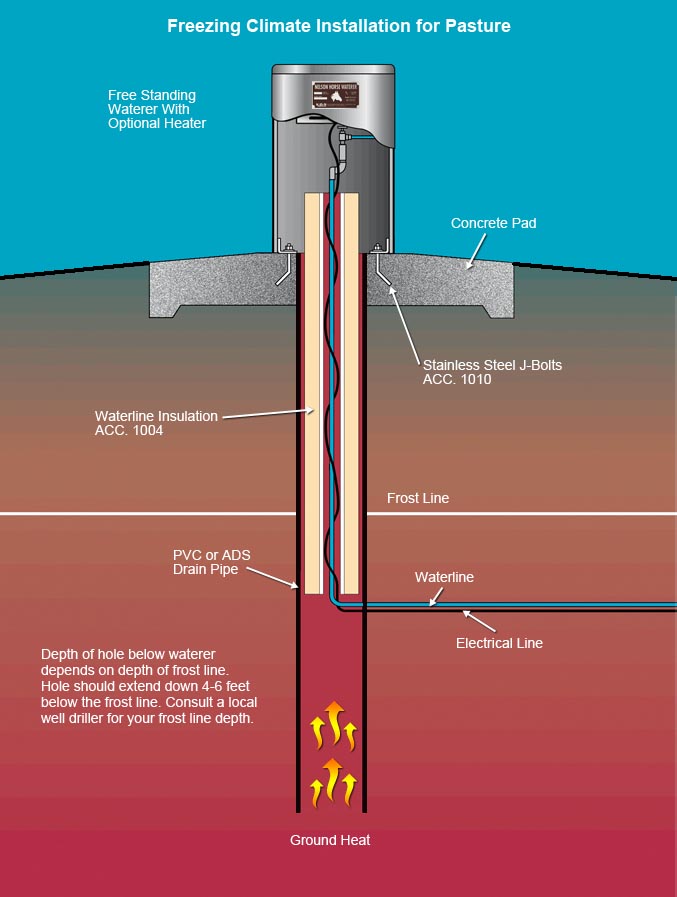
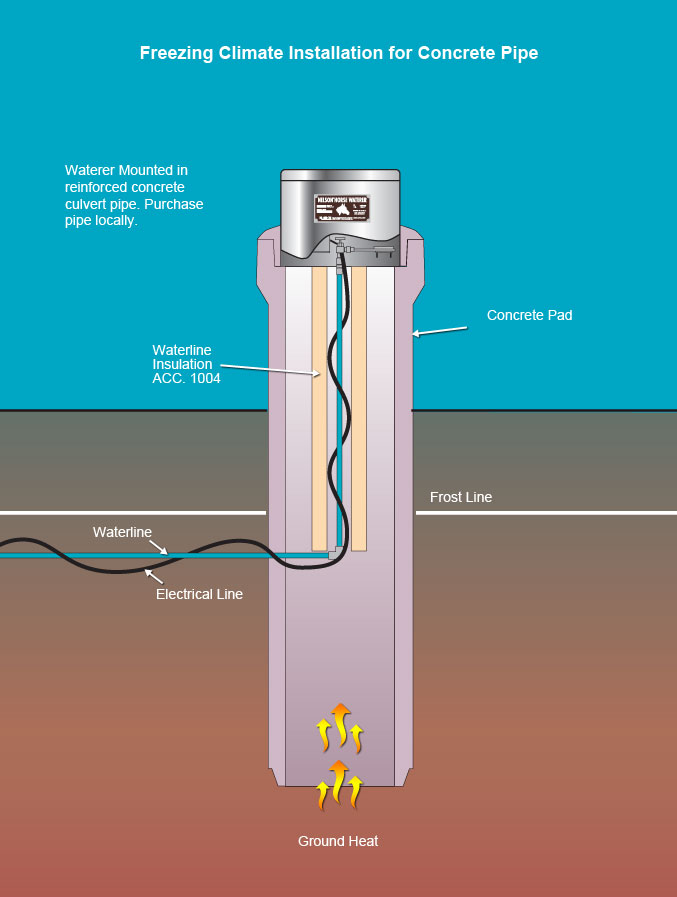
 – Nelson 700 Series Automatic Waterers

Installation must be made and maintained in strict accordance with national local electrical codes. Installation must be done by a qualified electrician. Improper electrical installation or maintenance may result in serious injury or death for personnel or animals or damage to structures.

To replace the heating element, you will need to shut off the electric power to the waterer, and shut off the water supply. Remove the pivot beam and cage for easy access to the junction box. This is accomplished by removing the lead weight, then removing the cotter key from the tapered end to the brass pivot shaft to slide the shaft out. The pivot beam and cage may then be removed as a unit. Disconnect all wires in the junction box.

Next take out the thermostat by removing the mounting nut located inside the junction box from the thermostat housing. The thermostat is free to be removed. With a pair of pliers, squeeze the end of the string relief and pull it out of the junction box. Then remove the two nuts securing the heater assembly to the cross beam.

Next remove the heater assembly from the waterer. The heater assembly consists of the heating element, heat deflector and two sets of ceramic insulators. There are three ceramic insulators to a set for a total of six ceramic insulators. Also included are two bolts, four nuts and two washers. It’s a good idea to use a table or a bench to reassemble the heater assembly with the new heating element. Start with the two bolts coming through the bottom of the heat deflector with both heads on the bottom. Next slide a single ceramic insulator down each bolt.

The flat side of the insulator should be on the bottom against the shield. Place the heating elements over the two bolts, so that it rests on the insulators. The tip of the heating element should be on the broad end of the deflector shield. The power cord of the heater should be on the narrow end of the deflector shield. Slide two more insulators down each bolt with the flat side of each insulator facing up. Place a stainless steel washer down each bolt so that they rest on top of the insulators. Next secure the heater assembly with a nut on each bolt, on top of the washer. With the two remaining nuts, attach the heater assembly to the cross beam of the waterer.

Locate the heater assembly so that the tip of the heating element is on the same side as the reflector shield located at the end of the cross beam. Snap the string relief connector to the end of the power cord at the base of the stripped wires. The head of the string relief connector should be pointed at the heating element. Loop the power cord of the heater over the cross beam along the side of the housing. Place the stripped wires through the junction box in the knockout hole located underneath the thermostat. Snap the string relief connector into the hole. Connect the wires within the junction box and your heater should work fine.

Call Nelson Manufacturing Company to obtain maintenance advice or to order parts, order automatic waterers, or any of Nelson’s products. Visit our internet site and click customer service on the main menu to obtain parts lists, maintenance guides and installation instructions.